Kategorier
Amateur Radio

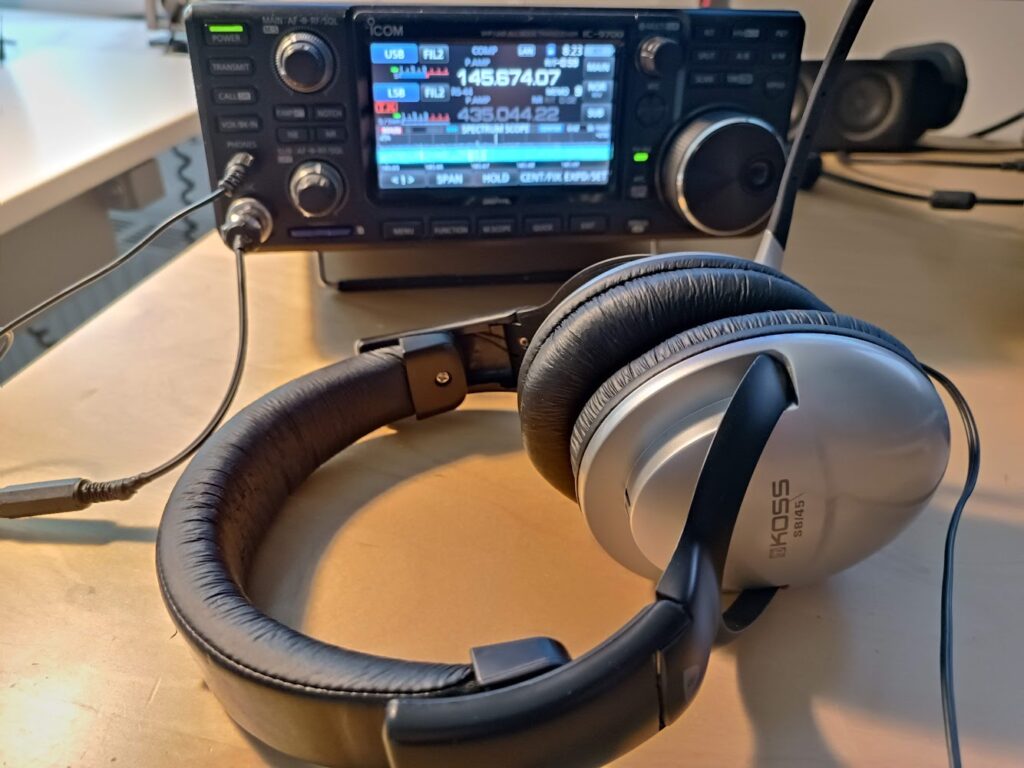
Koss SB-45 Headset for IC-9700

Koss SB-45

I have been looking for a headset for my IC-9700 and read that many are very pleased with the Koss SB-45 (SB/45) PC headset with electret microphone element.

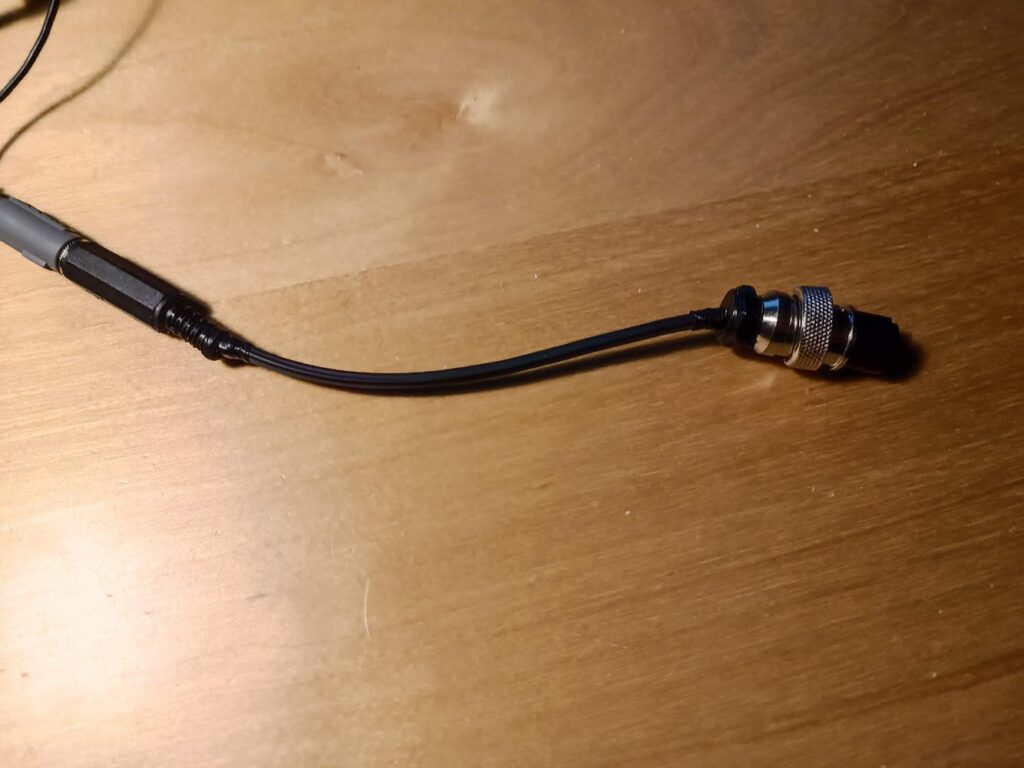
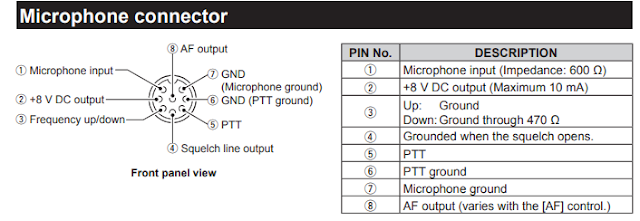
I got one for 20 EUR via the Swedish eBay site Tradera. I made a DIY adapter for the Icom standard 8-pin Mic connector – just connected pin 7 ”Mic ground” and pin 1 ”Mic input” to a 3.5mm female connector.

8 pin MIC adapter DIY

This is the pinout for the Icom 8 pin connector:

Icom Mic pinout

Here are some very short audio samples – first with the standard Icom mic and the second with the Koss SB-45. I’m using USB and maybe not exactly on the correct frequency when I did the recordings:

Icom HM-219 original mic
Koss SB-45 controlled with VOX

Some useful links:

Kategorier
Amateur Radio

RS-44 portable test

The setup

In september 2022 I did a portable test via the RS-44 satellite during a high elevation pass. I was just outside my house.

I did actually managed to hear myself. But… lot of stuff to handle at the same time: Arrow pointing, VFO, MIC… My tripod was to unstable.

I have the highest respect for everyone working linear satellites portable!

I need a lot more practice before making any roving. Practice = lot of time, that I do not have.

Equipment used:

  • Icom IC-9700 (used 10 watts output)
  • Lipo battery (11.1 volt, a little low for the IC-9700)
  • Standard MIC
  • Audiotronica HIFI headphones
  • Arrow Yagi
  • Hyperflex 5 coax cables
  • I tripod that did not work so well…

Kategorier
Amateur Radio

Online elevation profile tool

With this online tool you can see elevation profile. It shows that it is impossible for me to work low elevation sat passes to my east: https://randymajors.org/elevation-on-google-maps

Let’s look at this SatNOGS observation of LUSAT that has a strong carrier downlink. It is not possible for me to receive to the East:

Compared to a West pass:

Kategorier
Amateur Radio

3.5MHz to 50MHz Skyloop Antenna

When my End Fed Half Wave antenna wire broke I decided to try a new type of HF antenna. I google and many seen happy with the Skyloop (or Deltaloop) antenna so I decided to try that type. I will not go into detail about this antenna, there are tons of articles on Internet – just google and read. My primary source of info for my constructions is from this page at HF-Kits.

Wire and support

I used this type of ”robot lawn mower perimeter wire” – it seems to be a good cable for use as antenna wire.

My garden can fit a 80 meter loop, so in the spring 2022 I started to get two wire support point as high up I could throw in two trees:

At the corner of the house I needed two more support points:

This is the actual shape of the loop:

First installation – with Choke balun

For RF choke at the loop feedpoint I made a Guanella Choke:

The antenna feedpoint is as below. You can also see the MFJ RT-100 remote antenna tuner I’m using. This is needed as the loop only has 50 ohm at 3.5 MHz and 7 MHz without use of 2:1 balun (see the SWR charts below). I’m not sure about the exact length of the wire for the loop, around 84 meter.

It was not possible to tune the WARC bands with this setup so in the next installation I used a 2:1 balun.

Second installation – with 2:1 balun and no Choke

In order to be able to work the WARC band (with my MFJ tuner) I decided to try a 2:1 balun. Balun design can be found at many sites but I used this one:

And in the box:

I skipped the Choke balun this time to see if it should work anyway as I’m only working max 10 watts. I can not see any RF problems without the RF Choke. Below in the SWR graphs you can see the result.

SWR measurements

At antenna feedpoint, without Choke balun. I didn’t need to cut the antenna wire much to get a good match. Strange to see the good SWR at 3.5 and 7 MHz, as the loop has 100 ohm impedance.

Without 2:1 balun, only Choke

Next, with first version of 2:1 balun, antenna has the same length. You can see the much better SWR but the antenna is tuned a little low in frequency. At 3.5 MHz the SWR is now higher but better at all other frequency.

First test with balun

Below is the result after the balun is mounted in enclosure and antenna wire is cut/tuned a little. It is very good for 40m, 20m, 15m band and OK for 10m low end of band. 80m and WARC bands can be tuned with the remote tuner, that was not possible before without balun.

With this setup, the loop antenna can be used without tuner on several bands if needed.

Final version with balun and trimmed wire

Results and performance

I’m very happy with the result of this antenna! I have not been able to compare with my End Fed Half Wave (EFHW) antenna, so I can not back up my ”feelings” of the antenna result with actual numbers and facts. What I see when running FT8 and looking at PskReporter is:

  • My signal is heard at the same distance as I can receive, that was not possible with the EFHW antenna.
  • Received and sent signal reports are more equal now compared to the EFHW antenna.

I you have space for this antenna I highly recommend it. A 7 MHz version is just half the size of the 3.5 MHz version. It can be a little tricky to set up as four (or three for Delta Loop) support points are needed. Also, I recommend to use a 2:1 balun. In my case, the Choke balun was not needed.

Some initial results from PskReporter FT8 and WSPR with the second version with balun:

First 5 minutes with the antenna, 2:1 balun – 10 MHz FT8 with 8 watts. I was heard in VK.

WSPR over 24h, aprox. 200 mW. 433 unique spotters heard my signal. No VK this time…
30 min FT8 40m to 10m at 16:00 UTC. Some TX on 30m (10 MHz), as you can see my signal heard in VK.
Same evening, 30 minutes CQ with FT8 on 20m (14 MHz).
Kategorier
Amateur Radio

12h of WSPR with Skyloop antenna

Results from a 12 hour WSPR night test with new 80 meter Skyloop antenna. Transmitter Zachtek Desktop 200 mWatt. 336 unique spotters on 80, 40, 20 and 15 meter band.

Test started 17.00 UTC and ended 05.00 UTC.

80 meter band (3.5 MHz)
40 meter band (7 MHz)
20 meter band (14 MHz)
15 meter band (21 MHz)
Kategorier
Test and Q&A

Selenium C# Page Object Model utan PageFactory

PageFactory för Selenium C# har from. version 3.11 utgått. Det har under en övergångsperiod gått att använda med ett tilläggspaket (NuGet) som heter DotNetSeleniumExtras.PageObjects men från version 4 av Selenium stöds inte heller det.

PageFactory anses av flera inom Selenium-community inte vara ett bra stöd i konceptet Page Object Model (POM), även om jag själv inte haft några problem med det. Längst ner i detta inlägg finns några länkar till anledningen bakom att sluta stödja PageFactory, om du vill veta mer.

Vad är då PageFactory? Jo det används för att initiera webbelement i POM-classen och elementen får därför en funktion som liknar cachning. Denna bild från guru99.com visar bra hur man definierar webbelement med PageFactory:

Från guru99.com

Om man vill uppgradera sitt Selenium-projekt till version 4, vilket är bra för att få nya funktioner och eventuella säkerhetspatchar, krävs det att man konverterar @FindBy till FindElement vilket får till följd att webbelementen letas upp under runtime när testet körs. Det är egentligen ganska lätt att konvertera men kan ta lite tid. I det projekt jag jobbar med nu var det ca. 700 webbelement som fick konverteras manuellt, men egentligen utan några större problem.

Om ett element i PageFactory ”hittades” så här:

        [FindsBy(How = How.Id, Using = "account")]
        public IWebElement MyAccount { get; set; }

Så får man konvertera det till:

public IWebElement MyAccount => _driver.FindElement(By.Id("account"));

Och sen får man ta bort initieringen av PageFactory och till slut avinstallera NuGet-paketet DotNetSeleniumExtras.PageObjects.

Det jag upptäckt efter konverteringen är att vissa delar av testerna har varit anpassad för PageFactory och beter sig nu lite annorlunda. Ett exempel är om man vill kolla om ett webbelement finns på sidan (i DOM:en), tex. om en knapp ska synas eller inte. Beroende på vilket front-end ramverk som används kanske elementet bara är ”hidden” eller ”not enabled” men det kan även vara så att det inte finns alls. Just det fallet kan man lösa genom följande:

Skapa en generell metod (här i classen BasePage.cs) som sätter ner tiden (här till 5 sekunder) hur länge Seleniums webdriver ska vänta på ett element är tillgängligt i DOM:en. Om du inte sätter ner tiden får du vänta i den tid som gäller generellt för ImplicitWait, i mitt fall 30 sekunder (timeSpan).
Om elementet sedan är tillgängligt returneras true, annars false eftersom ett NoSuchElement-exception kan kastas och det tas hand om med catch.
Observera att ImplicitWait sätts tillbaka till 30 sekunder när resultatet returneras vilket innebär att resten av testmetoden som exekveras åter har webdrivern med sitt ursprungsvärde.

        public bool IsElementDisplayed(string elementToCheck, int time = 5)
        {           
            Driver.Manage().Timeouts().ImplicitWait = TimeSpan.FromSeconds(time);
           
            var present = false;
            try
            {
                IWebElement element = Driver.FindElement(By.Id(elementToCheck));
                present = element.Displayed;
            }
            catch (Exception)
            {
                            
               //Set back ImplicitWait to default 
                Driver.Manage().Timeouts().ImplicitWait = timeSpan;
                return present;
            }
            //Set back ImplicitWait to default 
            Driver.Manage().Timeouts().ImplicitWait = timeSpan;
            return present;
        }

Och i din testmetod, anropa metoden med webbelementet som en textsträng. Då får du en snygg assert som du kan hantera som du vill:

Assert.IsTrue(BasePage.IsElementDisplayed("sitelogo"), "Site logo not visible");

Det finns många olika sätt att hantera liknande fall och det aktuella behovet får avgöra hur du väljer att implementera. I mitt projekt var det enklast att göra på detta vis då vi har många tester om element syns (finns) eller inte i DOMen.

Om du överväger att komma bort från PageFactory för att kunna uppgradera till Selenium 4 hoppas jag att du fått lite ideer av mitt inlägg. Till slut kommer här ett antal länkar om du vill läsa mer om bakgrunden till PageFactory och varför den supporten nu upphör.

Lars Thunberg – Q&A-konsult inom testledning, systemtestning och testautomatisering

Kategorier
Amateur Radio

IC-705 IC-9700 scope setup

On YouTube there are several videos about setting up the spectrum scope of the Icom IC-705 and IC-9700. Last in this post I have linked one of these videos and I have actually done every step. It is now much better then the original settings.

I’m using colours like the one in SDR-Console software because that is how I’m used to have it.

The REF adjustment is very good to adjust when needed, to get the best contrast in the scope.

Also adjusting the SPAN to what you would like to see at the moment is a great function.

But, the best improvement for me was to change CENTER Type Display to Carrier Point Center (Abs. Freq.).

Here is the video from Ham Radio DX channel: